Enter your email at Tomatogram and we will send you big deals on software each week!
Google Toolbar Custom Button Tutorial
Have you installed the new Google Toolbar v.4 Beta? If yes, then you must have noticed the custom button feature. Read all about it on the Google Toolbar Features page. Did you try creating one for your website? I did, and it took me something like 10 minutes. Want to try it? Go to the Newster.net FAQ page and check out the last question.
This new feature is a boon for web developers like myself who don’t want to create a whole toolbar for simple functionalities (these days every website wants your to download their own toolbar. Finally you have more toolbars and less screen area to actually browse).
Want to create your own button for your website? Read on. Let me show you how I did it. Before you start make sure you have a favicon. This tutorial will teach you how to get one. If you don’t have a favicon your button will look like a Google button.
(If you would prefer to read the API documentation directly from the Google website, I have linked it at the very end of this article.)
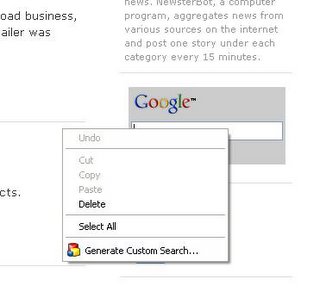
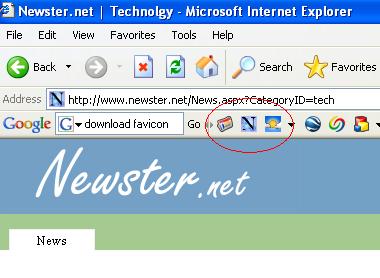
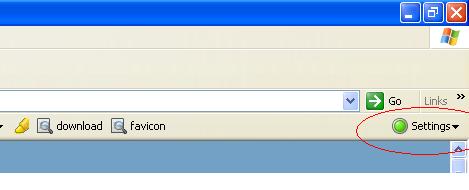
Step 1. Right click on the search box for your website and choose the option “Generate Custom Search…” option. See image below
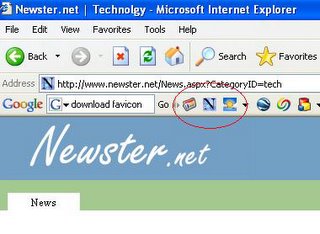
Follow the instructions and you will have a button added to your toolbar as shown below.
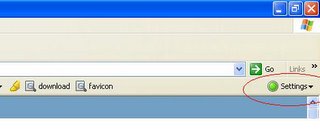
Step 2. Click on setting and go to the advanced editor. See images below.
---
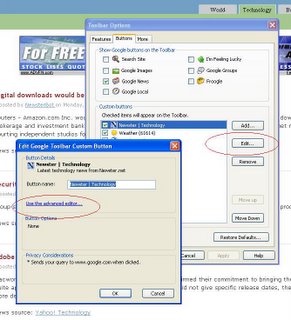
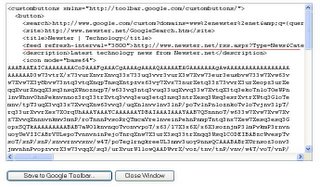
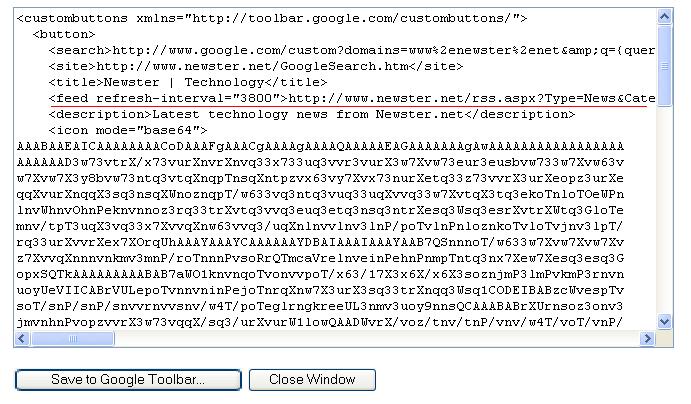
In the editor enter the following line as shown in the image below:
<feed refresh-interval="3800">http://yourdomain.name/rss_path.xml</feed>
If you have an ampersand in the path above you will encounter an error as shown below.
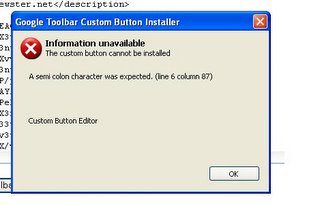
Just replace the "&" with "&" and it should fix the error.
(Note: this is a good time to save the XML file. Copy paste the content into a notepad and save with .xml extension. We will use this file in Step 3)
Click the “Save to Google Toolbar” button and you will see the see the feed added to the button you created in Step 1. See image below.
Step 3. Save the XML file to a location/directory on your web server. And use the following line to link to your own Google Toolbar Button:
http://toolbar.google.com/buttons/add?url=http://www.yourdomain.name/yourbutton.xml
Publish this link and let the world add your button to their own Google Toolbar.
Step 4. This step is optional, but wont hurt. Submit your custom button to the Google Button Gallery
That’s it! You are all set. But please note that this is a basic button and you can do much more with API documented on the Google website. Check out the links below. If you have any questions I will be glad to help. Please let me know if this tutorial helped you.
Related Links
Google tutorial: Create your own buttons
Full Google Toolbar API
This new feature is a boon for web developers like myself who don’t want to create a whole toolbar for simple functionalities (these days every website wants your to download their own toolbar. Finally you have more toolbars and less screen area to actually browse).
Want to create your own button for your website? Read on. Let me show you how I did it. Before you start make sure you have a favicon. This tutorial will teach you how to get one. If you don’t have a favicon your button will look like a Google button.
(If you would prefer to read the API documentation directly from the Google website, I have linked it at the very end of this article.)
Step 1. Right click on the search box for your website and choose the option “Generate Custom Search…” option. See image below

Follow the instructions and you will have a button added to your toolbar as shown below.
Step 2. Click on setting and go to the advanced editor. See images below.
---

In the editor enter the following line as shown in the image below:
<feed refresh-interval="3800">http://yourdomain.name/rss_path.xml</feed>
If you have an ampersand in the path above you will encounter an error as shown below.

Just replace the "&" with "&" and it should fix the error.
(Note: this is a good time to save the XML file. Copy paste the content into a notepad and save with .xml extension. We will use this file in Step 3)
Click the “Save to Google Toolbar” button and you will see the see the feed added to the button you created in Step 1. See image below.

Step 3. Save the XML file to a location/directory on your web server. And use the following line to link to your own Google Toolbar Button:
http://toolbar.google.com/buttons/add?url=http://www.yourdomain.name/yourbutton.xml
Publish this link and let the world add your button to their own Google Toolbar.
Step 4. This step is optional, but wont hurt. Submit your custom button to the Google Button Gallery
That’s it! You are all set. But please note that this is a basic button and you can do much more with API documented on the Google website. Check out the links below. If you have any questions I will be glad to help. Please let me know if this tutorial helped you.
Related Links
Google tutorial: Create your own buttons
Full Google Toolbar API
posted by Random Guy at
9:20 PM
![]()
![]()

10 Comments:
"Have you installed the new Google Toolbar 4.0 Beta?"
This release is 0.4 Beta, not 4.0.
By Anonymous, at 11:56 AM
Thanks for pointing out the mistake. I have corrected it.
By The Random Guy, at 9:36 AM
Thanks for this tutorial, I have really need this tutorial.
By Anonymous, at 3:19 AM
architects in bangalore , interior designers in Bangalore , interior designers in Bangalore , architects in bangalore , architects in bangalore , interior designers in bangalore , architects in bangalore
By Anonymous, at 10:40 AM
團購美食 ,汽車美容,二手車,中古車,環保袋,machining center,加盟 ,加盟創業 ,早餐店加盟 ,創業 ,創業加盟 ,加盟 ,加盟創業 ,早餐店加盟 ,創業 ,創業加盟 ,磁鐵,搬家公司,ISO9001認證,搜尋行銷,搜尋行銷
By 咪叩~, at 9:32 PM
萬事興搬家公司,專業提供台北搬家、桃園搬家、中歷搬家等精緻搬家服務。
By Anonymous, at 2:30 AM
Bentley GT operate in the parameters of -4/+6 seconds each day. If you posses Breitling Avenger that has super quartz movement, then it is guaranteed not to lose or gain 10 seconds within a year's time. Different Chrono Superocean will move differently and have different features. Newer models will have the quickest and most accurate movement. This is because research is always being done to create better Superocean with faster movement.
Now, if you happen to be a woman who wants a Coach Outlet and can not afford to pay for Coach Hamptons , you will feel like a kid in a candy store when you view Coach Madison the available selection. In my opinion, you can find Coach Luggage Handbags on website.
The Lowrise from ED Hardy is more of a "cute" look than the Highrise, at least in my opinion. However, ED Hardy Shoes does not detract from the looks whatsoever! In terms of the hardy shirt version, this shoe can be found in the original laceless style as well as in a number of eye-catching and colorful hardy shirt designs.
By Anonymous, at 9:16 PM
If you are archers, this is an easy and good way for you to hunt and get some FFXIV GIL. There have huge cheap ffxiv gil in our stock. Make order when you need please. And always, always, ALWAYS! Pick up what the monsters drop; this gets you a nice sum of Buy FFXIV Gil to use on skills and potions and all other necessities needed.
By Anonymous, at 9:19 PM
I'm very much interested into this. Good thing you have made tutorial. I am sure it's informative and useful.
By Leon Victor, at 6:34 AM
To know more regarding Creating Google Toolbar button visit this informative video. http://www.youtube.com/watch?v=UlFOQ-F6EFg
By Leon Victor, at 6:26 AM
Post a Comment
<< Home